
s idea came from a customer. Use flowers from a bridal bouquet inside clear resin bookends. There are many rules, techniques, and checks to do this temperamental form of art: Make a forever attractive display of beautiful flowers encases permanently in solid “Liquid Glass”. I remember as a boy that I wanted a rose to stay perfect so it could be saved. I tried spraying lacquer on the petals and in between to freeze it. Didn’t work. Now I know how. Because the bride who commissioned this job wanted to use her actual bouquet, the project left no room for any type of failure. What have I learned? · Flowers behave differently, some are easy and some are not. The more delicate flowers can’t be left in the dryer (a huge box of desiccant) for two weeks, or even ten days. Even rugged flowers can break, bend, and flop if not properly set while they are sucked dry without moving. You want them really dry (which is fragile) but not any more than necessary because the texture and colors change detrimentally. There is a resin spray (not lacquer) to lightly cover every part of the flowers to reduce bubbles. · The best leak-proof molding material for straight and curved sides is natural HDPE boards. It can be “polished” smooth to remove scratches. Remember, every scratch or bump inside your mold will appear on your casting. Thin boards curve easier without wrinkles. For a curved side, two ¼” wide sheets works better than one ½” piece. I put the ¼” sheets (these are 6” x 14” pieces) between banisters of our stairs bending it to a curve that fit the quarter ellipse arc designed for the bookends. The other pieces of the mold are straight. Machine threaded screw work well if the hole drilled is just smaller than the screw diameter. The beauty of symmetrical bookends is that only one mold is needed :) · Resin. So many tricks with resin. I’m still learning after doing this full time for three years. A 1/8” layer needs to cover the whole inside of the mold. This is so none of the flowers or leaves poke through to the surface. Done correctly, the thin layer is solid but still a little tacky. That helps for two reasons: the flowers stay where they are placed, and there is no visible line/layer between pours. Timing between pours is CRITICAL for the resin I’m using. I wait 16 hours, no more, no less. Use a vacuum chamber to reduce micro-bubbles. Check your level every time you pour. Stir resin with hardener slowly and completely. Pour smoothly without making bubbles. · Design of the flower arrangement must be done artistically, with forethought, structurally in layers from back to front. At each pour it helps to “paint” the insides of the mold with a thin layer of resin, which will hopefully be tacky to hold placement of flowers for the next layer up. Choose a focal point, use contrast, alignment, interest, and variety of shape and size and color to build the arrangement without bunching too close. The front and back should both look good because the sides are interchangeable. The arc is an important feature of a curved composition so take extra care to place and set long pretty flowers. · The piece will come out easily from the natural HDPE so don’t force, pry or scratch. It won’t be glassy or shiny except the one surface exposed to the air when it cured. Wearing gloves to prevent fingerprints, clean up the edges carefully with a single edge razor blade. Set the piece on a smooth level pedestal and paint a thin topcoat of resin using a smooth mini roller. · The one I just finished weighs 9 lbs and is 5” wide and 8” tall x 5.5” bas
WWedding Flowers in Resin
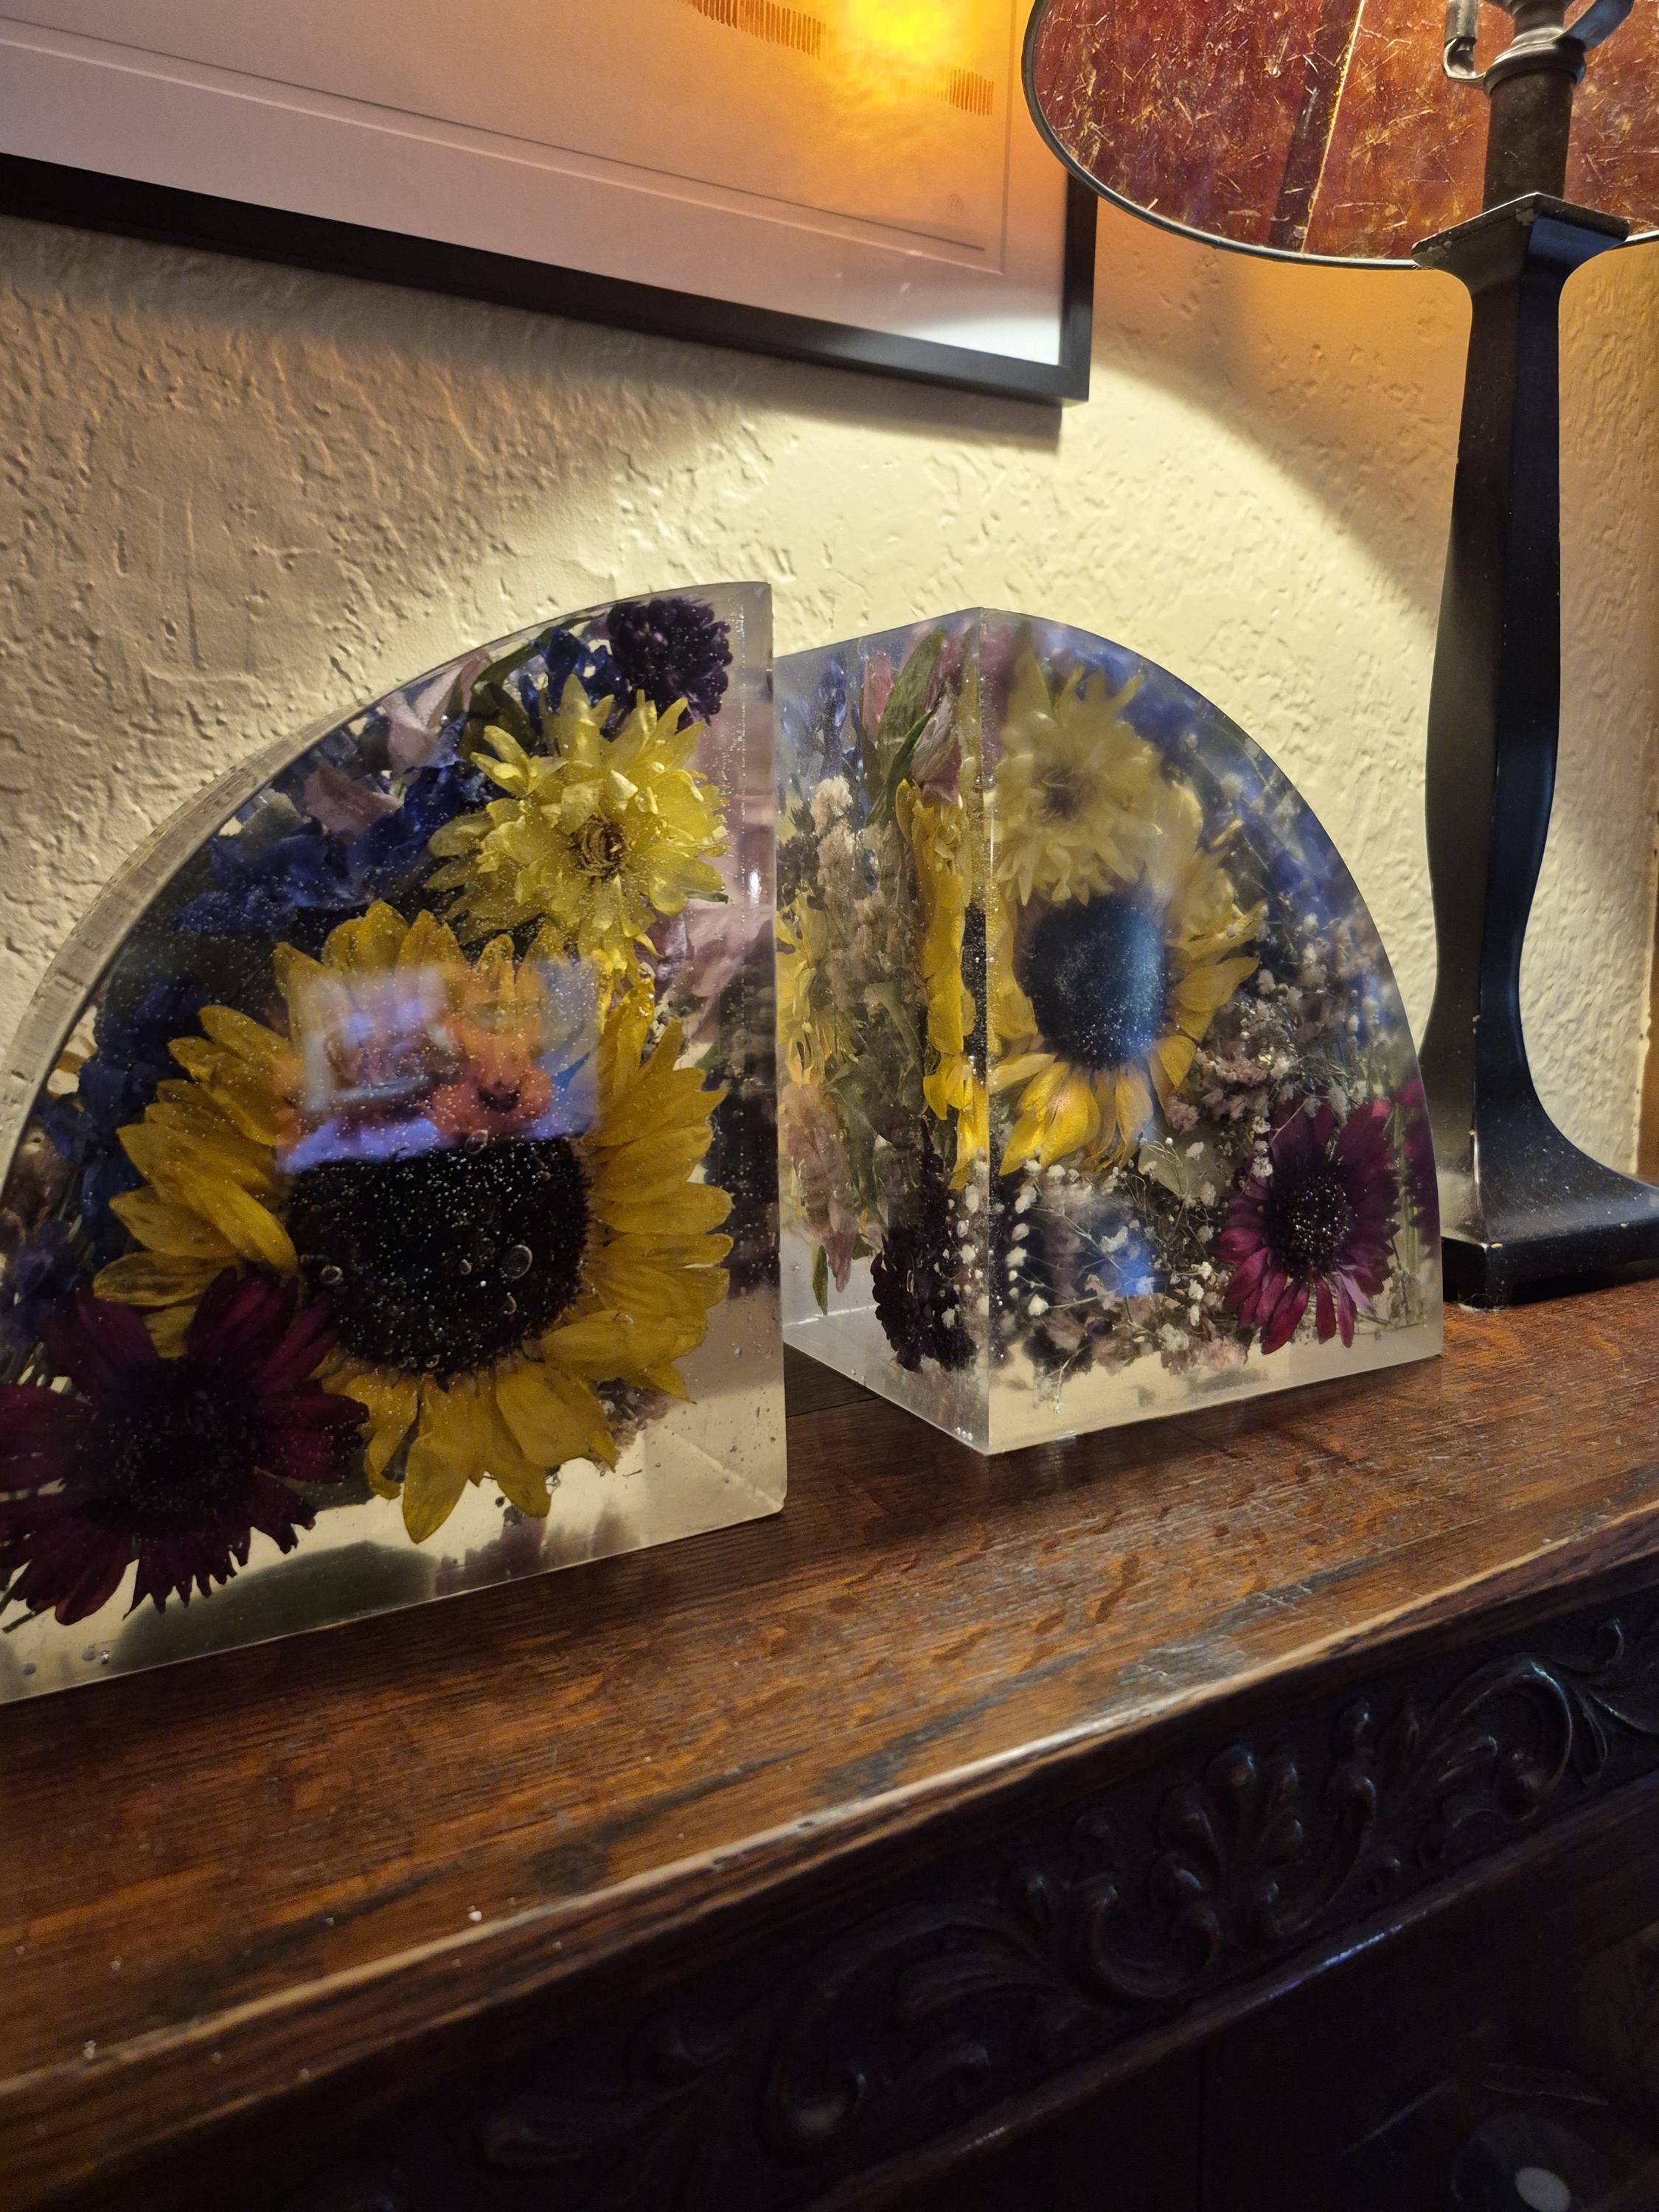
- This idea came from a customer. Use flowers from a bridal bouquet inside clear resin bookends. There are many rules, techniques, and checks to do this temperamental form of art: Make a forever attractive display of beautiful flowers encases permanently in solid “Liquid Glass”. I remember as a boy that I wanted a rose to stay perfect so it could be saved. I tried spraying lacquer on the petals and in between to freeze it. Didn’t work. Now I know how. Because the bride who commissioned this job wanted to use her actual bouquet, the project left no room for any type of failure. What have I learned? · Flowers behave differently, some are easy and some are not. The more delicate flowers can’t be left in the dryer (a huge box of desiccant) for two weeks, or even ten days. Even rugged flowers can break, bend, and flop if not properly set while they are sucked dry without moving. You want them really dry (which is fragile) but not any more than necessary because the texture and colors change detrimentally. There is a resin spray (not lacquer) to lightly cover every part of the flowers to reduce bubbles. · The best leak-proof molding material for straight and curved sides is natural HDPE boards. It can be “polished” smooth to remove scratches. Remember, every scratch or bump inside your mold will appear on your casting. Thin boards curve easier without wrinkles. For a curved side, two ¼” wide sheets works better than one ½” piece. I put the ¼” sheets (these are 6” x 14” pieces) between banisters of our stairs bending it to a curve that fit the quarter ellipse arc designed for the bookends. The other pieces of the mold are straight. Machine threaded screw work well if the hole drilled is just smaller than the screw diameter. The beauty of symmetrical bookends is that only one mold is needed :) · Resin. So many tricks with resin. I’m still learning after doing this full time for three years. A 1/8” layer needs to cover the whole inside of the mold. This is so none of the flowers or leaves poke through to the surface. Done correctly, the thin layer is solid but still a little tacky. That helps for two reasons: the flowers stay where they are placed, and there is no visible line/layer between pours. Timing between pours is CRITICAL for the resin I’m using. I wait 16 hours, no more, no less. Use a vacuum chamber to reduce micro-bubbles. Check your level every time you pour. Stir resin with hardener slowly and completely. Pour smoothly without making bubbles. · Design of the flower arrangement must be done artistically, with forethought, structurally in layers from back to front. At each pour it helps to “paint” the insides of the mold with a thin layer of resin, which will hopefully be tacky to hold placement of flowers for the next layer up. Choose a focal point, use contrast, alignment, interest, and variety of shape and size and color to build the arrangement without bunching too close. The front and back should both look good because the sides are interchangeable. The arc is an important feature of a curved composition so take extra care to place and set long pretty flowers. · The piece will come out easily from the natural HDPE so don’t force, pry or scratch. It won’t be glassy or shiny except the one surface exposed to the air when it cured. Wearing gloves to prevent fingerprints, clean up the edges carefully with a single edge razor blade. Set the piece on a smooth level pedestal and paint a thin topcoat of resin using a smooth mini roller. · The one I just finished weighs 9 lbs and is 5” wide and 8” tall x 5.5” base.